
Shopmade Recessed Pulls – FineWoodworking
This site contains affiliate links. I may earn a small commission, at no extra cost to you.

Once I first began to construct furnishings, the pulls have been typically an afterthought in my design course of. I might get a lot of the approach by means of constructing a bit solely to appreciate that I wanted some solution to open up the cupboard doorways and drawers. The widespread consequence was a bit of {hardware} that by no means felt absolutely built-in into the general really feel of the cupboard. Now I attempt to think about my choices for pulls from the very first sketches.

This inset pull is one I’ve developed over the previous few years and have used efficiently in lots of items of furnishings. The design and supplies might be modified to go well with a wide selection of various furnishings types and kinds. You may choose wooden for the pulls to introduce a contrasting or complementary tone. I typically decide darkish wooden, and wenge is a favourite. It’s useful if the wooden you select has pretty straight grain in order that tearout is much less of a priority throughout the fabrication course of.
Resawn blanks
These pulls are made by resawing a clean, shaping finger holes within the thicker half, gluing the 2 items again collectively, after which crosscutting the clean into particular person pulls. To carry out all of the operations safely, it’s necessary to make use of lengthy blanks. Even should you solely plan to make one or two pulls, I like to recommend milling a clean not less than 16 in. to 18 in. lengthy. The pulls should be thick sufficient in order that they’re snug to make use of once you insert a finger into the recess, however not so thick that inlaying the pull into the door turns into an issue. I usually set the pulls in a mortise 3/8 in. deep, and the entrance of the pull sits happy with the door or drawer entrance by 1/16 in. to 1/8 in. You lose just a little thickness once you resaw the clean aside, so I discover that 5/8 in. is an effective beginning thickness for it. The clean’s width needs to be about 1/8 in. over the ultimate width of the pull; this enables for some trimming after the clean is reassembled.

Begin by milling the clean, then resaw it, reducing a 1/8-in.-thick slice off of what would be the again of the pulls. This allows you to bore holes by means of the primary physique of the clean and form a cove into the bottom of the finger openings. I just like the bandsaw for the resawing, but it surely could possibly be executed on the desk noticed. After separating the 2 components, skim the sawn faces with a cross by means of the planer to organize them for being glued again collectively. I exploit a melamine auxiliary mattress within the planer when operating these skinny components.
Openings

Subsequent, you’ll lay out and reduce the openings for the pulls. A round gap is the best to provide, as it may be reduce utilizing a Forstner bit within the drill press. If one other form is desired—an oval, for instance—a lot of the pull-making steps are similar, however you’ll must create a router template for the opening. (To see how I make a template for oval pulls, go to FineWoodworking.com/316.)
For pulls with spherical openings, lay out centerpoints alongside the physique of the clean. To ascertain the spacing between centerpoints, issue within the size of the pulls plus an additional 1/4 in. of waste between pulls for last trimming. Chuck a Forstner bit in your drill press and set a fence so the holes will likely be centered within the width of the clean. Then drill out every gap during the piece.

Whether or not you’ve made spherical holes or oval ones, it’s now time to form the underside of the cutout to make it extra pleasing to the contact. For this operation, I exploit a bearing-guided coving bit on the router desk. The bearing will hint the within form of the cutout and create a 1/4-in. cove on the within edge that’s good for a fingertip to drop into.

For security’s sake, it’s important to make this reduce in a number of mild passes, every taking not more than 1/32 in. Increase the bit barely after every cross. When you take too heavy a cross, there’s a threat that the extreme vibration may trigger you to lose management of the piece and let go, which is particularly harmful with the bit inside a closed loop. So creep up slowly on the reduce, ensuring that every one the openings get a cross at every peak earlier than you increase the bit. Additionally, be sure that to chop within the appropriate course; a climb reduce right here is harmful. I maintain elevating the bit till the flat above the cove is a bit more than 1/16 in. large.

As soon as the underside of every opening is formed, the 2 halves of the clean might be reunited. Earlier than gluing them again collectively, do any last hand-shaping and sanding on the lip and within the cove. It’s necessary that the pull be pleasing to work together with, so the perimeters should be softened, and the components that can come into contact with the fingertips should be silky clean. I don’t all the time apply end to the inside of those pulls, however if you want to, now can be the time to take action. Simply be sure that to tape off the glue surfaces so the clean might be laminated again collectively.

Glue administration is the secret when doing this meeting. It’s principally inconceivable to scrub up any squeeze-out within the inside cavity, so solely apply as a lot glue as strictly wanted, and maintain it away from inside edges as a lot as doable. Use a few small clamps to handle the tendency for the 2 halves to wish to slide aside, after which clamp the entire thing right down to the sting of a inflexible floor with a caul on prime to distribute the strain evenly.
Reduce aside and form the pulls

When the glue is dry, trim the clean to last width. Double-check to ensure the cutouts are centered within the pull, and rip accordingly. Then crosscut the blanks to separate the pulls. Use a miter gauge or crosscut sled on the desk noticed, and use a cease block to make sure all of the pulls are the identical measurement.

I break the skin edges of every pull at this level with both a small roundover or a chamfer. It helps the sting of the pull stream into the door and makes the general impact extra cohesive. As soon as that’s executed, the pulls could possibly be put in as they’re, and I’ve actually executed it that approach. However with expertise I spotted that reducing a shallow rabbet across the perimeter of the pull makes the joint between it and the door a lot cleaner and simpler to cover. And the small lip on the prime of the rabbet gives some insurance coverage towards glue squeeze-out.

When reducing the rabbet, it’s necessary to arrange your router desk to forestall tearout and to make this operation with small items secure. I begin by laying an MDF cowl sheet excessive of the router desk. The quilt sheet, which has only a small cutout for the bit and one other cutout for the height-adjustment knob, eliminates any inconsistencies between the elevate plate, the throat, and the desk, so the small components can’t get hung up on an edge.

I reduce the rabbet with a Whiteside 1305 mortising bit, which is comparatively cheap and has a shearing reduce that helps to make sure a clear edge. To guard the wooden fibers on the delicate prime fringe of the pull, and to maximise security, it is very important have a zero-clearance auxiliary fence as effectively. A chunk of three/4-in. MDF is my alternative right here. A chunk of 1/2-in. MDF may work, however something thinner has an excessive amount of flex in it. Clamp it onto your router-table fence, ensuring the clamps are above the peak of the pulls in order that they don’t intrude. The rabbet will likely be 1/8 in. deep at most, so it’s not crucial for the bit to increase any greater than that by means of the face of the auxiliary fence.
When reducing the rabbets, use a hold-down paddle and a backer block to maintain the small items flat to the desk and sq. to the fence and your fingers away from the bit. The order of cuts is necessary. Make the primary reduce throughout an end-grain aspect; that approach, any tearout on the nook will likely be eliminated as you make the following cross down the long-grain edge. Ditto for the 2 following passes.
Reduce the mortises and set up the pulls

You now have pulls able to be inlaid into the door. I exploit a router and template to chop the mortise. For one or two pulls you could possibly lay out the mortise, rout the waste freehand, and chisel to your format traces. However even for just some pulls, I discover it simple sufficient and way more correct to make a template and pattern-rout the mortises. I exploit a pattern-cutting bit with a top-mounted bearing to do the mortising, so my template might be one-to-one with the pull.
I make the template utilizing 1/2-in. MDF and the meeting methodology. First, I rip a bit of MDF to the precise width of the pull. I crosscut that piece in two after which glue these two items between bigger items of MDF. I separate the 2 small items to match the size of the pull, making a window that completely matches the pull. Be sure the template is giant sufficient to accommodate clamps. When you’ve got a number of doorways or drawer fronts with pulls in the identical location, you may add a fence to the template to assist find it relative to the sting of the workpiece.
 |
 |
To rout the pocket, clamp the template in place and plunge the bit into the door or drawer entrance. A plunge router is the best choice for this, however a fixed-base router can be utilized; you’ll simply must tip the bit into the reduce. Relying on the bit you might be utilizing and the fabric you might be reducing into, this will should be executed in just a few passes, which is one other good motive to make use of a plunge router. When put in, the pull ought to backside out utterly within the mortise, making the most of the long-grain glue floor there with out leaving a niche on the prime edge.

I end the doorways and the pulls individually earlier than glue-up. It’s a lot simpler to complete a door or drawer entrance when it’s flat, and the pull when it may be dealt with. To attach the pulls in, I exploit a block with a cork face as a caul. Be sure to not put an excessive amount of glue within the mortise, as it’s going to have nowhere to go and will stop the pull from seating absolutely.
Creating Pulls With an Oval Opening

First determine on the form and draw it out on a bit of 1/4” MDF. A drafting ellipse template is a superb instrument for this. The template must have sufficient size on both aspect of the reduce out for it to be hooked up to the pull clean with double stick tape. A few inches on both aspect is nice.
Drill a gap on the waste aspect of the template and reduce as near the road as you may with a coping noticed or scroll noticed. Then use a spherical backed rasp or file to high quality tune the form. It’s necessary to get this form proper as it will likely be the template for all the subsequent cut-outs.
 |
 |
Now lay out the strip with the situation and form of the cutouts. I be sure that to depart not less than 1/4” of waste between every pull for last trimming. Each will should be absolutely traced out utilizing the template.


To take away the waste, drill overlapping holes after which reduce to the format line with a coping noticed or a scroll-saw. The aim is to have as a lot of the waste faraway from contained in the opening as doable, whereas leaving a 1/32” to a 1/16” to rout off utilizing the template.

Fastidiously double stick tape the template into place above the rough-sawn cutout and use a 1/4” bottom-bearing flush-cut bit mounted in a router desk to scrub the remaining waste away. Ensure that the bit is sufficiently small that it will possibly’t get trapped contained in the closed gap and switch the whole clean into spinning weapon. And be sure you are routing in the correct course.
 |
 |

As soon as all of the holes are trimmed to the format line, put a bearing-guided coving bit within the router desk and reduce a cove for finger buy on the again face of the clean. Make these coves very steadily in a sequence of small cuts—I increase the bit simply 1/32 in. between passes. The picture above reveals spherical holes, however the coves for the oval ones are routed in simply the identical approach.
—Owain Harris makes customized furnishings in Gonic, N.H.
Effective Woodworking Advisable Merchandise
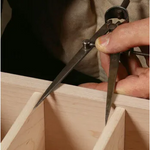
Dividers
Extremely helpful for laying out, setting equal distances, and evaluating measurements, these are a necessary instrument for any furnishings maker.

Drafting Instruments
Add a gap information to this package, and you will have the instruments it’s essential work out your designs with scale drawings.
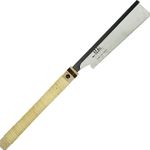
Suizan Japanese Pull Noticed
A flexible noticed that can be utilized for something from kumiko to dovetails. Mike Pekovich recommends them as a woodworker’s first handsaw.
Join eletters at this time and get the most recent strategies and how-to from Effective Woodworking, plus particular affords.
Obtain FREE PDF
once you enter your e mail tackle under.

")
