
Sleek Little Packing containers – FineWoodworking
This site contains affiliate links. I may earn a small commission, at no extra cost to you.
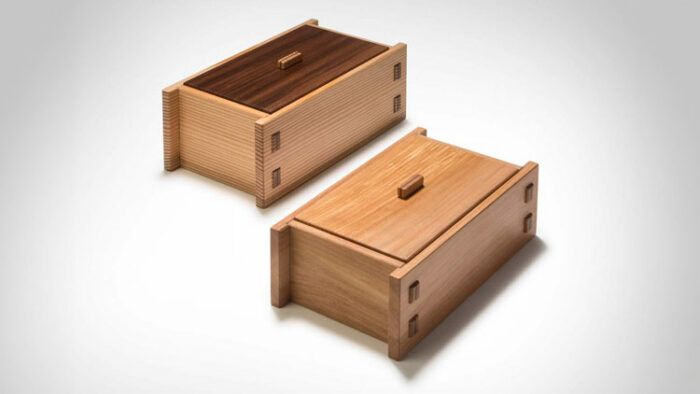
These bins are very loosely primarily based on the type of a standard Japanese toolbox. Nonetheless, whereas these toolboxes are a utilitarian triumph of kind assembly operate, nailed collectively and sized to completely maintain the required instruments, these little bins have been designed to be constructed with offcuts and to apply an exacting joint, the jammed through-tenon. The joinery is actually overkill for a field of this measurement, however it’s satisfying to execute properly and pleasing to have a look at. I take advantage of a mix of handwork and machines, however this mission is also executed fully by hand for an extra problem.
Milling materials
 |
 |
| Prep the perimeters of the field. The lengthy sides of the field get dadoed and mortised, whereas the brief sides get tenons that will probably be wedged in place. | Lower the dadoes. Sterns cuts the dadoes within the lengthy sides on the desk noticed with a dado blade. Then he cleans up the cuts with a router aircraft and test-fits the brief sides into the dadoes. |
The scale of the field ought to be decided by the dimensions of the items out there, as it’s supposed to be constructed from fascinating scraps. Whereas the size and peak of your out there wooden might fluctuate, I do discover 3/8 in. to be an excellent thickness for the perimeters of a field shorter than about 1 ft. in its longest dimension, which is what I’ll give attention to right here. Start by milling your inventory barely over thickness and letting it relaxation for a day or two to acclimate if a whole lot of materials was eliminated.

Wedged through-tenon joinery
Subsequent, lay out the mortises. The perimeters of the mortises are flush with the perimeters of the dadoes, so a marking gauge set to the perimeters of the dado can be utilized to put out the mortises on the skin of the field. As soon as the mortise format is accomplished, drill out many of the waste and pare the perimeters sq. with a chisel.
 |
 |

Now the tenons will be laid out. Insert the brief ends into the dadoes, ensuring the highest and backside edges are flush. Use a really sharp pencil or a knife pressed to the within partitions of the mortise to mark the tip grain of the perimeters. Mark the depth of the tenons across the ends of the perimeters with a marking gauge. Setting the gauge to the thickness of the perimeters will permit the tenons to protrude 1/16 in. when the joint comes collectively.

Carry the marks delineating the tenons across the sides with a sq., then reduce the tenons on the desk noticed on a crosscut sled. First, noticed the highest and backside of every tenon, then take away the waste between the tenons with a number of passes. Subsequent, flip the piece 90° and reduce the waste on the shoulders. I depart the knife line after which take the final slice of wooden with a pointy chisel.
|
|
|
|


Rabbets and grooves
 |
 |
As soon as the mortises and tenons are reduce, mill the rabbets to carry the lid and the grooves to just accept the underside. These are executed on the router desk with a straight bit. Each the highest rabbets and backside grooves will be run by way of on the brief sides, however they have to cease on the dadoes on the lengthy sides.

The router desk can be used right now to chamfer the highest and backside edges of the perimeters. On the lengthy sides, the chamfers should not run into the dadoes. Cease them brief now, and full them with a chisel with the field dry-assembled. For chamfering the ends of the perimeters and the highest, I want to make use of a block aircraft.
| Meeting
This field’s diminutive measurement and easy joinery make glue-up a breeze. Nonetheless, for further safety, Sterns makes customized clamping cauls with cutouts for the through-tenons and wedges. Their contact factors are cushioned with thick card inventory. |
||
 |
 |
 |
Detailing the joinery
Among the many major visible options of this field are the proud tenons. They protrude previous the perimeters of the field, however not far sufficient to simply work on after glue-up. Use a chisel to chop small, crisp chamfers on the perimeters of every tenon. Subsequent, reduce kerfs in every tenon for the wedges. Use a small handsaw, slicing the kerfs vertically or diagonally by way of the tenons.

The wedges will be reduce by hand, however when making many for a batch of bins I want to make use of a easy jig on the bandsaw. The jig consists of a chunk of wooden with a notch the identical form and measurement because the wedges it is advisable reduce. The notched aspect is lined up with the bandsaw blade, with the opposite aspect of the jig working on the fence. Essentially the most acceptable woods for wedges are onerous, long-grained species akin to oak or onerous maple. A bit of the right width and thickness is match into the notch and run by way of the noticed, leaving an ideal wedge within the jig. Flip the wedge clean with every cross to make sure the grain retains working parallel to the face of the wedge. A zero-clearance throat plate retains the wedges from falling into the noticed.

Elevating the underside

The underside of the field is strong wooden. To find out its size and width, assemble the field sides, then set them on the underside piece and hint the within dimension of the field onto the underside. Add the depth of the underside grooves to this and trim the underside to measurement. Airplane and sand the underside to supply a completed floor, then with a straight bit on the router desk, increase the panel to slot in the groove. Lastly, use a hand aircraft to trim a bit greater than 1/32 in. from every lengthy grain aspect to permit for wooden motion.
Prefinish and glue up

Virtually not one of the surfaces are accessible as soon as the field is assembled, so the ultimate step earlier than gluing up is to sand to 400 grit and prefinish with shellac. As soon as the end has dried, dry-fit the field one last time and flippantly apply wax to the ends of the tenons and sides across the mortises, in addition to any inside corners. Watch out to not wax any glue surfaces. This precaution will ease squeeze-out cleanup and assist defend the completed surfaces. Glue up the field with the underside put in. Clamp the field to seat all of the components, take away the clamps to insert the wedges, trim them sufficient to get the cauls on, and reclamp the field. After the glue is dry, take away the clamps and thoroughly trim the wedges flush with a pointy chisel.
A lid with a laminated deal with

The lid, constructed from wooden of a colour complementary to the field wooden, drops into the highest rabbet. Mill it barely oversize, then match it to the rabbet with a hand aircraft. The field might not be completely sq., so begin by becoming adjoining sides, then full the match on the remaining two sides.

As soon as the lid is fitted, the deal with will be made and put in. Begin by resawing the fabric 3/32 in. thick. It’s simpler and safer to mill these small handles from a big clean, so start with oversize items. Clear up the resawn surfaces and glue them collectively. As soon as the sandwich has dried, true up the tip grain on one finish with a block aircraft.
 |
 |
Mill a tenon on the desk noticed by slicing grooves on each side of the fabric. Separate the oversize deal with with a handsaw and trim to the specified size. On the router desk, reduce a mortise within the middle of the highest of the lid with a 1/8-in. router bit, making it 1/8 in. shorter than the ultimate size of the deal with. Use a file to around the ends of the deal with tenon, and match it to the lid mortise. Sand and end each items earlier than gluing the deal with on.

—Joshua Sterns is a woodworker and teacher in Fort Bragg, Calif.


Advantageous Woodworking Really useful Merchandise
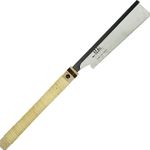
Suizan Japanese Pull Noticed
A flexible noticed that can be utilized for something from kumiko to dovetails. Mike Pekovich recommends them as a woodworker’s first handsaw.
Join eletters at present and get the most recent strategies and how-to from Advantageous Woodworking, plus particular affords.
Obtain FREE PDF
while you enter your e mail tackle beneath.

